Thursday, March 1, 2012

You Rock!


Happy Thursday!
It's the start of my weekend! That's the problem working in dentistry...4 day weeks! :)

On to my card...my DH asked me to make him a card for young man that he mentors. It is his 18th birthday. I have the hardest time creating cards for teens...especially guys!
But I came up with this idea!
 I wanted to utilize the technique featured on the tutorial for this week on Nichole Heady's
Make It Monday #55 for Paper Trey Ink
This technique shows how to use smaller frames to make  larger frames. 

I chose the Frame-It (Waltzingmouse) stamp set. I stamped the frames onto watercolor paper, making the 2 frames look like 1 long frame!
I spritzed the paper with water, then sponged it with Citrus and Sail Boat Blue alcohol inks (Ranger). The edges were then sponged with Silver Mixative (Ranger).


The guitar was cut on my Cricut  machine with the Nifty Fifties cartridge, set  at 5".  I sponged the edges with Black Soot Distress ink, and Silver Mixative.
I decided to attach the musical notes with dimensionals to make it look like they were floating around the card!
The sentiment "You Rock" is from the Thanks2You (Stamps of Life) stamp set. 
I added some pizazz with  2 silver embellies!
All of this was then adhered to white card base.

Thanks for stopping by!

Mackie 

Sunday, February 26, 2012

Thanks!

Hello everyone!  This post will show a Thank You card gift set that I needed to make for a good friend, who had made me some delicious pimento cheese and some YUMMO chocolate fudge! Now I was in heaven with this stuff..but starting tomorrow... another diet!
Wish me luck!
I got the idea from a "Simon Says" blog post. The original design called for Tim Holtz distress stains and a Hero Arts stamp. I didn't have either, so I used Tim Holtz distress alcohol inks and stamping pads.
The stamp is from  Stamps of Life called Thanks2You.

I inked the flowwer onto watercolor paper with Versamark ink and then heat embossed with white embossing powder.
I misted them with water and applied the various colors. The embossed flowers resisted the inks!

Dusty Concord, Faded Jeans, Walnut Distress Inks:

Sunset Orange, Citrus, Sunshine Yellow Distress Alcohol inkers:


Spun Sugar, Picket Fence, Faded Jeans Distress Ink:

Picket Fence, Tattered Rose, Walnut Stain Distress Ink:

 Each one was misted with Mr. Huey-Calico White or Champagne Glimmer Mist-Stampin Up or both.
Each panel was then adhered to white card stock and then onto the kraft card stock. I rounded the corners and added ribbon or twine.

Thanks for stopping by!

Mackie

Sunday, February 12, 2012

Thinking of You


Good Morning! Hope all is well with everyone! I am sharing some cards today that I CASED from a beautiful card that was in the February "CARDS" magazine. I just love this magazine! You must get yourself a copy!
The original card was created by the very talented Lynn Mangan.  I just loved it. And I remembered it when I  sadly had two occasions of needing sympathy cards.  Lynn Mangan used sentiment and medallion stamp sets from Paper Trey Ink. I did not have these stamps so I used stamp sets that I already had. 


 The doily stamps that I used are from the Dainty Doilies-Large (Waltzingmouse) stamp set . On the second card I stamped the doily onto some scripted DP that I had whitewashed with Gesso. Also, on the second card I ran the back panel thru the Big Shot with a Herringbone embossing folder.
Both cards were very simple, but pretty in an understated way which I thought was very appropriate for the occasion.

Thanks for stopping by!

Mackie
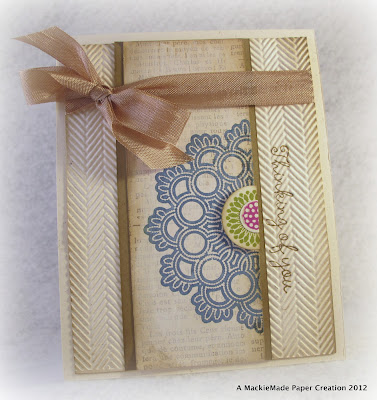
Stamps: Dainty Doilies (Waltzingmouse Stamps); Sympathy4You (Stamps of Life)
Ink: Lettuce, Denim, Wild Plum (Adirondack Earthtones-Ranger)
Paper: Rustic Cream Cardstock (Paper Trey Ink); Market Street Lost & Found ( My Mind's Eye)
Accessories: Herringbone EF (Sizzi); seam binding (Snug Hug); pearl

Tuesday, January 31, 2012

Thank You So Much


Happy Tuesday!

I made this happy card using the colors required for the 


I stamped the background with the stamp set Beautiful Blooms Two (PTI) with Guava, Sky, Strawberry and Artichoke ink (Color Box by Stephanie Barnard).  I then stamped the banner with the same colors.
The technique for making this cool banner is on the Paper Trey Blog. It is called a Dimensional Sentiment Banner and it was featured on Nichole Heady's Make It Monday segment this week!
I added some cute flower buttons and Voila! A Happy card!!!!!!

Thanks for stopping by!
Mackie

Stamps: Beautiful Blooms Two( Paper Trey Ink); Rainbows & Clouds (Lil Inker)
Inks: Guava, Strawberry, Sky, Artichoke (ColorBox by Stephanie Barnard)
Accessories:buttons, embellies, button twine

Monday, January 30, 2012

love.


This very CAS card was made with the

The Verve Divas have decided to add  a CAS sketch to their monthly sketches. 
Clean and Simple has become very popular.  It is difficult for me because I want to keep adding to my cards. When I see other people's cards, I LOVE them!
So...I'll keep trying and keep getting inspired by the Verve Diva's creations!

Thanks for stopping by!
Mackie

Stamps: Text It (Waltzingmouse); Love Notes ( Verve)
Ink: Riding Hood Red (SU); Black (Memento)
Classic Hearts, Classic Scalloped Hearts ( Spellbinders)

Sunday, January 29, 2012

I'm always ear for you!


This card was created using the Week 2 


I pulled out one of my older MFT stamps and used some Copic Inks! eeek!
I know I must practice, but Copics scare the bejeesus out of me!

Thanks for stopping by!
Mackie

Stamps: You're My Snuggle Bunny (MFT); Heart Lines (Fluorishes)
Paper: Stella Rose (My Mind's Eye)
Ink: Wild Hare (Color Box); Black (Memento); Black Soot (Distress)
Copic Markers: E33, E31, C-5, C-3
Accessories: Labels 10 (Spellbinders); Viva Pearl Pen Ice White; ribbon & embellies

Thursday, January 26, 2012

You're My Hero


I created this card with the
in mind! 

 I did tweak it just a bit, but I think it still follows the sketch pretty closely!  
I did not have to stamp very much, because the papers (Blush-My Mind's Eye) I used were so beautiful!
The heart was cut with the Classic Heart Spellbinder die. Before I popped it out of the die, I stenciled the edges with SU Pixie Pink ink. I then stamped the heart with the sentiment (Verve-Thankful Hearts).
The stitches were made with my Sew Easy tool.
I then layered some lace and pleated ribbon across the bottom of the card.

Thanks for stopping by!

Mackie

Stamps: Thankful Hearts (Verve)
Paper: Blush (My Mind's Eye); Chocolate Chip (Stampin Up)
Ink: Chocolate Chip, Pixie Pink (Stampin Up)
Dies: Classic Heart (Spellbinders)
Accessories: Lace, pleated satin ribbon, pink heart embellie

Vintage Chic Scrapbook


I took a workshop last weekend at the Donna Downey Studios in Huntersville, NC, which was taught by Donna Downey herself!

WOW!

And this is what we made!

The workshop was so inspirational!

I had so much fun!

Her studio is awesome! You must visit it if you are ever in this area!


The pages are 6 x 9 pieces of cardboard that we painted with Gesso.
Then, the edges were inked with Viva Inka-Gold.
We decorated the pages with burlap, canvas, pennants,
 dollhouse frames, a Tim Holtz watch, flowers and all kinds of good stuff!


The photos were printed  on copy paper and crinkled up. I then distressed them with some Tea Stain Distress ink to make them look aged.
The album turned out absolutely beautiful!
This project was so different from anything that I had tried in the past.
I am so glad I went!

Thanks for stopping by!
Mackie

Sunday, January 15, 2012

Hope your day is AWESOME!


Hello my friends! It has been a long time! I hope you will continue to check on me because I love your visits! Today's card is my attempt at  collage stamping. 
That is the challenge this week over at the JUGS!
This week is  technique challenge and I love to try new techniques!  
There is a great tutorial on Splitcoast Stampers.  

I wanted to try this with a more masculine card that I needed to make. I have had this great stamp set by WPlus90 Design Studios for quite some time. I thought it would work perfect for collage stamping.
First, I stamped the background with Wild Hare (Color Box).  Next I stamped the stars with Mustard Seed (Distress).  Then I stamped the Baja Blue images and stars. This technique calls for heat embossing, so I used Versamark Ink for the word Awesome and heat embossed in black embossing powder with my heat gun. I distressed all the edges with my Close to My Heart distressing tool.  I spritzed the entire panel with white Smooch Spritz. Hopefully you can see the sparkle on the card.

I am not so sure about this technique, or this card! When I photograph it, the colors on the DP panel do not match the stars! It matches perfect IRL!!! 

Hope you have a great Sunday!
Thanks for stopping by!
Mackie

Wednesday, January 4, 2012

Name Plate


Hello my friends! How are ya?
I am slowly but surely recovering form my knee surgery. I sure haven't been able to sit at my craft desk as much as I like, but I sure have been doing a lot of blog hopping! That's how I came across the idea for making this adorable Name Plate! I was inspired by a post on Creations with Christina.
 She was showing some of her 2011 highlight videos and this one caught my eye! 
You must visit her tutorials. 

The name plate is made with a combination of white card stock and chipboard. After you assemble the pieces together you paint them with a basecoat. I chose a chocolate brown. Next, you paint over the entire name plate with a crackle paint medium. Then paint again with white paint and it crackles, making it look like old, painted wood. 

After everything is dry, the fun begins! You get to decorate it!


I chose 2 Cricut cartridges that I had not yet tried . The fun flowers were made with The Flower Shoppe cartridge. Love this cartridge! So much fun! There are so many possibilities and combinations you can make with this cartridge. I highly recommend it!
And I used the Elegant Edges cartridge to make the orange scalloped panel behind the name plate.
I'm gonna like this cartridge, too!!!!
I added some ribbon, twine, button and brads and ta da....a name plate!


Now who's name did I want to use?
I decided I would give it to someone special! Hope she likes it!
I plan to make some more of these!

Thanks for stopping by! I love reading your very special comments!
They make my day!
Mackie